Testing and inspection of diving cylinders

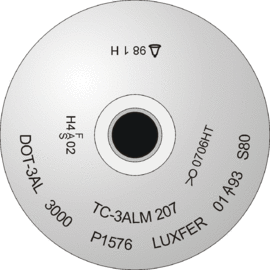
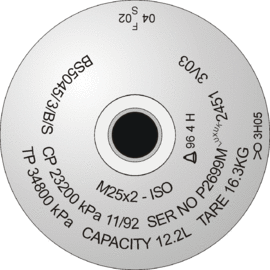
Transportable pressure vessels for high-pressure gases are routinely inspected and tested as part of the manufacturing process. They are generally marked as evidence of passing the tests, either individually or as part of a batch (some tests are destructive), and certified as meeting the standard of manufacture by the authorised testing agency, making them legal for import and sale. When a cylinder is manufactured, its specification, including manufacturer, working pressure, test pressure, date of manufacture, capacity and weight are stamped on the cylinder.[1]
Most countries require diving cylinders to be checked on a regular basis. This usually consists of an internal visual inspection and a hydrostatic test. The inspection and testing requirements for scuba cylinders may be very different from the requirements for other compressed gas containers due to the more corrosive environment in which they are used.[2] After a cylinder passes the test, the test date, (or the test expiry date in some countries such as Germany), is punched into the shoulder of the cylinder for easy verification at fill time. [note 1] The international standard for the stamp format is ISO 13769, Gas cylinders - Stamp marking.[1]
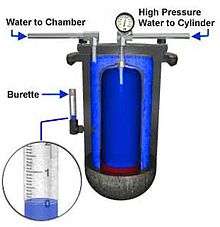
A hydrostatic test involves pressurising the cylinder to its test pressure (usually 5/3 or 3/2 of the working pressure) and measuring its volume before and after the test. A permanent increase in volume above the tolerated level means the cylinder fails the test and must be permanently removed from service.[3]
An inspection may include external and internal inspection for damage, corrosion, and correct colour and markings. The failure criteria vary according to the published standards of the relevant authority, but may include inspection for bulges, overheating, dents, gouges, electrical arc scars, pitting, line corrosion, general corrosion, cracks, thread damage, defacing of permanent markings, and colour coding.[3][2]
Gas filling operators may be required to check the cylinder markings and perform an external visual inspection before filling the cylinder and may refuse to fill non-standard or out-of-test cylinders. [note 2]
Intervals between inspections and tests
A cylinder is due to be inspected and tested at the first time it is to be filled after the expiry of the interval as specified by the United Nations Recommendations on the Transport of Dangerous Goods, Model Regulations, or as specified by national or international standards applicable in the region of use.[4][5]
- In the United States, an annual visual inspection is not required by the USA DOT, though they do require a hydrostatic test every five years. The visual inspection requirement is a diving industry standard based on observations made during a review by the National Underwater Accident Data Center.[6]
- In European Union countries a visual inspection is required every 2.5 years, and a hydrostatic test every five years.[7][8]
- In Norway a hydrostatic test (including a visual inspection) is required 3 years after production date, then every 2 years.
- Legislation in Australia requires that cylinders are hydrostatically tested every twelve months.[9]
- In South Africa a hydrostatic test is required every 4 years, and visual inspection every year. Eddy current testing of neck threads must be done according to the manufacturer's recommendations.[2]
Procedures for periodic inspections and tests
If a cylinder passes the listed procedures, but the condition remains doubtful, further tests can be applied to ensure that the cylinder is fit for use. Cylinders that fail the tests or inspection and cannot be fixed should be rendered unserviceable after notifying the owner of the reason for failure.[10][11]
Identification of cylinder and preparation for testing
Before starting work the cylinder must be identified from the labelling and permanent stamp markings, and the ownership and contents verified.[12][13]
Depressurisation and removal of cylinder valve
Before internal inspection the valve must be removed after depressurising and verifying that the valve is open. Cylinders containing breathing gases do not need special precautions for discharge except that high oxygen fraction gases should not be released in an enclosed space because of the fire hazard. If the valve is blocked or stuck closed it may be necessary to release the pressure by removing the burst disc or drilling into the valve body below the valve seat. These operations require care to avoid injury.[14][15]
External visual inspection
Before inspection the cylinder must be clean and free of loose coatings, corrosion products and other materials which may obscure the surface. Foreign materials may be removed by brushing, controlled shot-blasting, water-jet cleaning chemical cleaning or other non-destructive methods. The method used must not remove a significant amount of cylinder material,[16] and steel cylinders may not be heated above 300°C.[17] Aluminium cylinders are even more restricted in the temperatures permitted, which are specified by the manufacturer.[18]
The cylinder is inspected for dents, cracks, gouges, cuts, bulges, laminations and excessive wear, heat damage, torch or electric arc burns, and corrosion damage. The cylinder is also checked for illegible, incorrect or unauthorised permanent stamp markings, and unauthorised additions or modifications. If the cylinder exceeds the rejection criteria for these items it is unsuitable for further service and will be made permanently unserviceable.[19][20]
Typical rejection criteria include: (to be added)
Internal visual inspection
Unless the cylinder walls are examined by ultrasonic methods, the interior must be visually inspected using sufficient illumination to identify any damage and defects, particularly corrosion. If the inner surface is not clearly visible it should be cleaned by approved method which does not remove a significant amount of wall material. Methods allowed include shot-blasting, water jet cleaning, flailing, steam or hot water jet, rumbling and chemical cleaning. The cylinder must be internally inspected after cleaning.[21][22]
Typical rejection criteria include: (to be added)
Supplementary tests
When there is uncertainty whether a defect found during visual inspection meets the rejection criteria, additional tests may be applied, such as ultrasonic measurement of pitting wall thickness, or weight checks to establish total weight lost to corrosion.[23] Hardness tests on aluminium cylinders are done on the cylindrical body and must avoid making deep impressions.[24]
Cylinder neck inspection
While the valve is off, the threads of cylinder and valve must be checked to identify the thread type and condition. The threads of cylinder and valve must be of matching thread specification, clean and full form, undamaged and free of cracks, burrs and other imperfections. Tap marks[note 3] are acceptable and should not be confused with cracks. Other neck surfaces will also be examined to be sure they are free from cracks. In some cases threads may be re-tapped, but if the threads are altered they must be checked with the appropriate thread gauges.[25][26]
Pressure test or ultrasonic examination
Ultrasonic inspection may be substituted for the pressure test, which is usually a hydrostatic test and may be either a proof test or a volumetric expansion test, depending on the cylinder design specification. Test pressure is specified in the stamp markings of the cylinder. The results of a correctly performed pressure test are final.[27][28]
Inspection of valve
Valves that are to be reused must be inspected and maintained to ensure they remain fit for service.[29][30]
The recommended practice for valve inspection and maintenance includes inspection, and where applicable correction of threads, cleaning of components, replacement of excessively worn and damaged parts, packing and safety devices, lubrication as applicable with approved lubricants for the gas service, checks for correct operation and sealing at intended operating pressure. Checks may be done with the valve fitted to the cylinder after inspection and testing, or before the valve is fitted.[31][32]
Gauging of threads may be mandatory to ensure the integrity of parallel threads. If the gauge exceeds the maximum gauge limit for taper threads, re-tapping may be considered at the discretion of the competent person.[33]
Final operations


The interior of the cylinder must be thoroughly dried immediately after cleaning or hydrostatic testing, and the interior inspected to ensure that there is no trace of free water or other contaminants.[34][35]
If the cylinder is repainted or plastic coated, the temperature must not exceed 300°C for steel cylinders,[36] or the temperature specified by the manufacturer for aluminium cylinders.[18]
Before fitting the valve the thread type must be checked to ensure that a valve with matching thread specification is fitted.[37] Fitting of valves should follow the procedures specified in ISO 13341 Transportable gas cylinders - Fitting of valves to gas cylinders.[38]
After the tests have been satisfactorily completed, a cylinder passing the test will be marked accordingly. Stamp marking will include the registered mark of the inspection facility and the date of testing (month and year).[39][40]
Records of a periodic inspection and test are made by the test station and kept available for inspection. These include:[41][42]
Identification of the cylinder:
- name of current owner;
- cylinder serial number;
- mass of cylinder;
- name of the cylinder manufacturer;
- manufacturer's serial number;
- cylinder design specification;
- cylinder water capacity or size;
- date of test during manufacture.
Records of the tests and inspections:
- type of inspections and tests done;
- test pressure;
- date of the test;
- whether the cylinder passed or failed the inspections and tests (giving reasons for failure);
- identification stamp mark of the test station;
- identification of tester;
- details of any repairs made.
Rejection and rendering cylinder unserviceable
If a cylinder fails inspection or testing and cannot be recovered, the owner must be notified before making the empty cylinder unserviceable by crushing, burning a hole in the shoulder, irregular cutting of the neck or cylinder or bursting using a safe method. If the owner does not give permission they become legally responsible for any consequences.[43]
Notes
References
- 1 2 International standard ISO 13769, 1st Ed.2002-07-01 Gas cylinders - Stamp marking
- 1 2 3 South African National Standard SANS 10019:2008
- 1 2 NOAA Diving Manual, 4th Edition CD-ROM prepared and distributed by the National Technical Information Service(NTIS) in partnership with NOAA and Best Publishing Company
- ↑ ISO 6406 2005, Section 3.
- ↑ ISO 10461 2005, Section 3.
- ↑ Henderson, NC; Berry, WE; Eiber, RJ; Frink, DW (1970). "Investigation of scuba cylinder corrosion, Phase 1". National Underwater Accident Data Center Technical Report Number 1. University of Rhode Island. Retrieved 2011-09-24.
- ↑ BS EN 1802:2002 Transportable gas cylinders. Periodic inspection and testing of seamless aluminium alloy gas cylinders
- ↑ BS EN 1968:2002 Transportable gas cylinders. Periodic inspection and testing of seamless steel gas cylinders
- ↑ AS 2030.1—1999 Australian Standard: The verification, filling, inspection, testing and maintenance of cylinders for storage and transport of compressed gases. Part 1: Cylinders for compressed gases other than acetylene, Third edition 1999. Reissued incorporating Amendment No. 1 (March 2002). Standards Australia International Ltd, GPO Box 5420, Sydney, NSW 2001, Australia ISBN 0-7337-2574-0
- ↑ ISO 6406 2005, Section 4.
- ↑ ISO 10461 2005, Section 4.
- ↑ ISO 6406 2005, Section 5.
- ↑ ISO 10461 2005, Section 5.
- ↑ ISO 6406 2005, Section 6.
- ↑ ISO 10461 2005, Section 6.
- ↑ ISO 10461 2005, Section 7.1.
- ↑ ISO 6406 2005, Section 7.1.
- 1 2 ISO 10461 2005, Section 14.2.2.
- ↑ ISO 6406 2005, Section 7.2.
- ↑ ISO 10461 2005, Section 7.2.
- ↑ ISO 6406 2005, Section 8.
- ↑ ISO 10461 2005, Section 8.
- ↑ ISO 6406 2005, Section 9.
- ↑ ISO 10461 2005, Section 9.
- ↑ ISO 6406 2005, Section 10.
- ↑ ISO 10461 2005, Section 10.
- ↑ ISO 6406 2005, Section 11.
- ↑ ISO 10461 2005, Section 11.
- ↑ ISO 6406 2005, Section 12.
- ↑ ISO 10461 2005, Section 12.
- ↑ ISO 6406 2005, Annex F.
- ↑ ISO 10461 2005, Annex F.
- ↑ Staff (2005). Gas container test stations- General requirements for periodic inspection and testing of portable and transportable refillable gas containers. SANS 1825. Pretoria: Standards South Africa. Table 3. ISBN 0-626-16556-3.
- ↑ ISO 6406 2005, Section 15.1.1.
- ↑ ISO 10461 2005, Section 14.2.1.
- ↑ ISO 6406 2005, Section 15.1.2.
- ↑ ISO 6406 2005, Section 15.2.
- ↑ ISO 10461 2005, Section 14.3.
- ↑ ISO 6406 2005, Section 15.4.
- ↑ ISO 10461 2005, Section 14.5.
- ↑ ISO 6406 2005, Section 15.7.
- ↑ ISO 10461 2005, Section 14.8.
- ↑ ISO 10461 2005, Section 15.
- CEN. EN 1089-2:2002 Transportable gas Cylinders, Part 2 - Precautionary labels Superseded by EN ISO 7225:2007.
- CEN. EN 1089-3:2004 Transportable gas Cylinders, Part 3 - Colour coding Current standard.
Sources
Technical Committee ISO/TC 58, Gas Cylinders, Subcommittee SC4 (2005). "Gas cylinders - Seamless steel gas cylinders - Periodic inspection and testing" (PDF). ISO 6406:2005(E). Geneva: Onternational Standards Organisation. Retrieved 4 August 2016.
Technical Committee ISO/TC 58, Gas cylinders, Subcommittee SC4 (2005). "Gas cylinders - Seamless aluminium-alloy gas cylinders - Periodic inspection and testing" (PDF). ISO 10461:2005(E). Geneva: International Standards Organisation. Retrieved 5 August 2016.
External links
![]() Media related to Diving cylinders at Wikimedia Commons
Media related to Diving cylinders at Wikimedia Commons

%2C_is_fitted_with_a_Kirby_Morgan_37_Dive_Helmet.jpg)